Table of Contents
Rationale and Specification
Similar to the first version of my website detailed here, I wanted a website to post about different milestones in my projects and career. My blog offered a way to reflect on my learning and to possibly help others through similar experiences. However, wanting to learn more in-depth about web development, I wanted to explore the inner-workings of a complete web application. To do this, I turned my Markdown blog into a completely over-engineered web application. Although this would not be a practical approach to create a blog, I wanted the challenge of understanding the different components of a web application and how I could fit them together to create a cohesive website.
For this new site, I wanted to keep the same features of the previous version, but rebuild each component. My original blog was created using Django, a Python framework, which did most of the work for me. However, in this new version, I learned about building an API with Express, creating user interfaces with React, using NGINX as a reverse proxy, and connecting everything using Docker. Overall, it was a huge project that allowed me to learn more about the different parts of a web application even if it was for a blog. This post will be less about specific implementation details and more about how I approached the project with new technologies.
Application Architecture
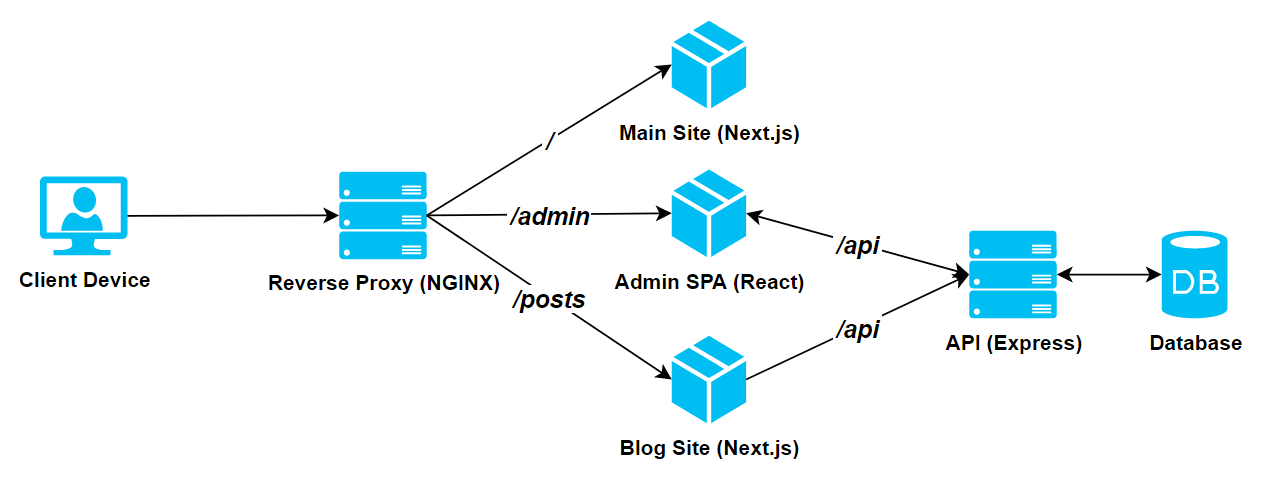
To support the backend for the blog, I created an Express API that allowed me to create, read, update, and delete blog posts from my database. All the frontend applications would connect directly to this API and allow for me to manage the blog. Using Create React App and Next.js, I created both single-page and server-rendered React applications. Finally, using Docker to containerize my separate and isolated applications, I connected them together by using NGINX as a reverse proxy.
Express API
For the API, I wanted a simple interface that would allow me to easily connect to my database and make changes. Additionally, I wanted to make sure that only authenticated users would be able to access my API. Lastly, I also needed validation so that user input would be sanitized and clean to store in the database.
Combining Express and pg-promise, I was able to connect my Express routes to my database and manipulate data based on the request. Overall, my API has four endpoints to deal with blog posts and allows me create, read, update, and delete posts. However, this does not solve my issue with authentication. Without any sort of authentication, anyone could access my API and make modifications to my blog posts.
To protect my API, I added JSON Web Tokens (JWT) and required a JWT to be provided in each request. More specifically, I used node-jsonwebtoken and integrated the library into an authentication endpoint in my API. Since I did not need multiple user accounts for my API, I decided that JWTs would be the ideal way to generate and validate tokens. JWTs are stateless and self-contained. This meant that I would not need to store user data within a database. JWTs consist of the header, payload, and signature. In the payload, I can claim that I am authorized to use my API. However, this payload is not encrypted, so anyone could potentially claim that they were authorized. The signature is what allows my API to verify that the JWT is valid. By issuing a JWT with a unique signature and validating it with the same signature, I can verify that the claims in the payload are true.
Even though I would be the only user accessing the API, I needed validation so that any user input would be sanitized. This is important at the API level because even though I can add client-side validation, this would also allow for another level of safety. In my case, I found express-validator and used it to ensure that every piece of user input would be safe to store.
React
In this project, I wanted to use React, a Javascript library for building user interfaces, because it was a new way of building web applications for me. Being component-based, it also allowed me to easily structure and organize my entire application. However, React is often used to build single-page applications and this means that content would be rendered on the client. In terms of search engine optimization, I was not entirely sure that this would be good for my blog. The primary purpose of a blog is to display content, so a single-page application may not have been the best choice. For the main blog portion of the site, I wanted it to be server-rendered. However, for the admin portal, I leaned towards building a single-page application. This would also allow me to learn the differences between client-side and server-side rendering in React.
Main Site
The main blog portion of the site is built in Next.js. Next.js is a React framework which has server-side rendering. By building this section of the site with Next.js, I am able to render my blog content and send it directly in each request. This allowed me to use React and organize my pages with components in a way that would help optimize for server-rendered content. On each page, I used my API endpoints to get information about my posts and render them to the user.
Admin Portal
For the admin portal, I wanted it to be a single-page application since I did not need it to be optimized for search engines in the same way as the main site. This would allow me to manage the blog with the performance of a single-page application. To do this, I used Create React App since it offered a build setup with no configuration. Minimizing the amount of work I had to do to get started, I was able to focus more on creating a working application. Being a single-page application, I had to create different views and connect them to different routes using React Router. Using the different API endpoints, I made an application that connected with my API and would allow me to manage my blog. However, since these endpoints need authentication through a JWT, I also needed to login and store the token in the application. Throughout my development process, I looked at the different options of storing the token. This included storing it in local and session storage, browser cookies, and just in the application's memory. Overall, the only user that would access this application would be me, so I decided that I would not mind logging in every time I wanted to change something. For this reason, I chose to store my JWT in the application's memory, so that it would have less chance of compromising my token.
NGINX Reverse Proxy
A reverse proxy is a server that can forward requests to different servers working behind it. Although using a reverse proxy has many different advantages, I primarily used it so that I could have a single server that rerouted requests to different servers and applications. Using NGINX Reverse Proxy, I was able to connect all the different client-facing applications together under one location and forward requests to the correct servers.
Since I was connecting every application to one central location, it was also important to build for relative paths. Without fixing the paths, one application might be trying to access a path on the reverse proxy and have it forwarded to a different server. As a result, I also learned the importance of configuration and environment variables. By setting up my applications in a way that was modular in terms of its configurations, I could change a path on the reverse proxy and easily fix it through a configuration variable in my application.
Docker
Docker is a tool that helps containerize applications so that they can be easily deployed. Since I built my applications as separate services that can be run isolated, Docker was a great tool that helped me group everything together. With Docker Compose, I was able to group the different containers for my applications and easily manage my entire website.
Using configuration and environment variables in my actual applications, I could use the tools in Docker to allow me to manage different setups. Through build variables and environment variables in Docker, I was able to combine Docker and NGINX Reverse Proxy together to easily ship an entire application's infrastructure.
Conclusion
This project was definitely a huge endeavor, but I was able to learn a lot about the different aspects of building and deploying an entire web application. Although it was more complex than it had to be, it allowed me to explore an area that was really interesting and offered me a new perspective in web development. With so many tools and technologies to use, it is important to at least learn the basics and with this project, I believe that I got a good glimpse into these technologies. Even in this application, I was able to discover so many different technologies and learn how to use them all to form one cohesive website. Throughout it all, I was also shown the true power of configuration and environment variables since it allowed me to easily swap out one piece depending on what I needed. Changing the base path for one section of an application was only a few lines to change in my configuration.
Resources
- My Django Markdown Blog
- Blog API
- React
- NGINX Reverse Proxy
- Use NGINX As A Reverse Proxy To Your Containerized Docker Applications
- Reverse Proxy and React - Fixing paths
- Docker